UK Axe Skills: Safe Chopping & Splitting for Bushcraft

Axe work feels intimidating until the movement becomes deliberate instead of tense. This guide, as part of mastering foundational UK bushcraft skills, focuses on the basics that matter first: choosing the right tool, creating a proper safe working area, and using the axe for chopping and splitting without turning the job into a risk.
Choosing Your First UK Bushcraft Axe (or Hatchet)
Picking the right cutting tool is the first crucial step in developing safe and effective axe skills for UK bushcraft. For beginners, the choice often comes down to an axe or a hatchet, with a versatile bushcraft axe typically offering the best balance of power and control. What’s the real difference, then? Well, a hatchet is generally smaller and lighter, with a shorter handle (often 10-15 inches) and a head weight typically under 1.5 lbs. It’s brilliant for finer work, preparing kindling, or when pack weight is a serious consideration. An axe, on the other hand, is larger, with a longer handle (14-24 inches for a good bushcraft model) and a heavier head (usually 1.5-2.5 lbs). This extra size gives you more power and reach, making it more efficient for chopping larger branches, felling small dead trees (where permitted, of course!), or splitting bigger logs.
For general UK bushcraft, where you might be clearing a small area, processing firewood, or preparing materials for a shelter, We’d generally recommend a bushcraft axe with a head weight of around 1.5-2 lbs and a handle between 16-20 inches. This gives you a good blend of control for more delicate tasks and enough oomph for heavier work without being overly cumbersome. When you’re looking, pay close attention to a few key features. The head steel should be good quality carbon steel – it holds an edge well and is easier to sharpen in the field than stainless. The handle, ideally, should be made from a tough wood like hickory or ash, with the grain running parallel to the axe head for maximum strength. Avoid cheap plastic handles or those with the grain running perpendicular, as they’re much more prone to snapping.
It’s important to understand that a bushcraft axe is designed to be a versatile workhorse, capable of a range of tasks from carving to splitting. This is quite different from a heavy splitting maul, which is built purely for busting apart large logs, or a felling axe, which has a specific head geometry for cutting down trees. A bushcraft axe often has a thinner, sharper bit (the cutting edge) than a splitting maul, making it better for general chopping, but still robust enough for splitting smaller to medium-sized logs.
Many beginners remember their first axe, bought purely because it was “a bargain” from a discount outdoor shop. The head was loose, the steel was so soft it wouldn’t hold an edge for five minutes, and the handle felt like it would snap if you so much as looked at it funny. It is a proper rubbish tool, and trying to learn with it is frustrating and frankly, a bit dangerous. The lesson is that investing a bit more in a quality tool from a reputable brand like Gränsfors Bruk, Hultafors, or even a well-made Condor or Bahco, is money well spent. You can find these at good UK retailers such as Highland Outdoors, Woodlore, or even some dedicated online bushcraft stores. Don’t be afraid to consider second-hand options too; a well-maintained vintage axe head can be given a new lease of life with a bit of elbow grease and a new handle. Just make sure the head is securely fixed and free from major cracks or damage.
Expert Tip: When buying a second-hand axe head, always give it a good tap with something metallic. A clear, ringing sound usually means the steel is solid, whereas a dull thud can indicate hidden cracks. It is a simple trick many pick up over the years that saves them from a few dodgy purchases.
If you’re looking for more detailed gear advice, you might want to check out our essential UK bushcraft kit list.
UK Axe & Hatchet Comparison
| Tool Type | Handle Length (approx.) | Head Weight (approx.) | Primary Use | UK Bushcraft Suitability |
|---|---|---|---|---|
| Bushcraft Axe | 16-24 inches | 1.5-2.5 lbs | General chopping, splitting medium logs | Excellent (versatile) |
| Hatchet | 10-15 inches | 0.75-1.5 lbs | Finer work, kindling, light chopping | Good (portable) |
| Splitting Maul | 24-36 inches | 3-8 lbs | Splitting large, knotty logs | Limited (specialised) |
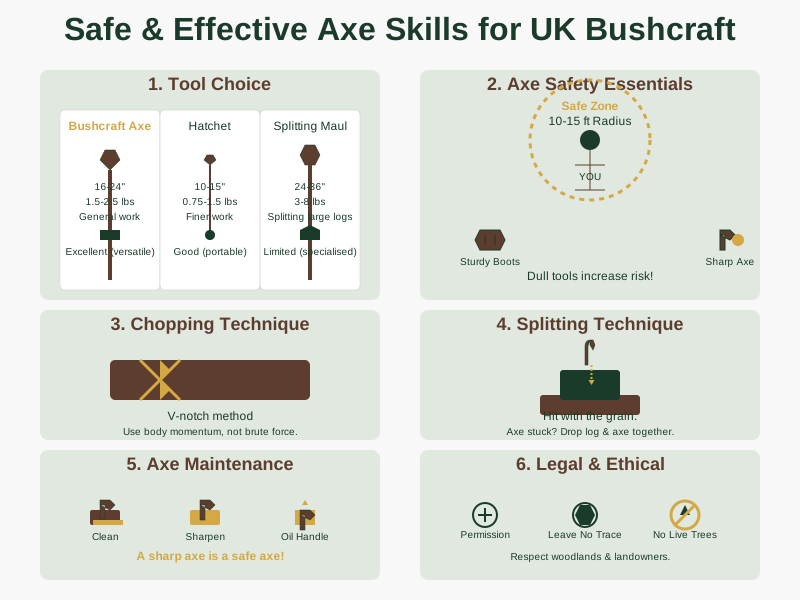
The Golden Rules of Axe Safety in the UK
Before you even think about swinging an axe, understanding and internalising the golden rules of safety is absolutely non-negotiable. An axe is a powerful tool, and while incredibly useful, it demands respect. Think of these rules not as tedious restrictions, but as the foundations for confident and injury-free axe work.
The first and arguably most crucial rule is establishing and maintaining your ‘Safe Zone’. This is a minimum 10-15 foot (around 3-4.5 metres) radius around you and your axe, clear of people, animals, and any obstacles. Why so big? Because an axe head can travel a surprising distance if it glances off wood, or if you lose your grip during a swing. Many beginners once see someone working in a group where a friend, rushing a cut, had his axe head bounce off a knot, sending it spinning barely a metre from another person’s leg. It was a real wake-up call for everyone there about the importance of that invisible bubble. Always visually check your safe zone before every swing, making sure no one has wandered in behind you or to the side.
Next up, Footwear: this is non-negotiable. You absolutely must wear sturdy, closed-toe boots. No trainers, no sandals, definitely no bare feet. A good pair of leather or robust synthetic boots with ankle support offers vital protection should you misjudge a swing or a piece of wood deflect unexpectedly.
Your Grip is also critical. For controlled, accurate work, you’ll often use a “control grip” where your dominant hand is closer to the axe head for precision. For more powerful chopping or splitting, you’ll shift to a “power grip,” with both hands further down the handle, allowing for a longer, more forceful swing. Crucially, always maintain a firm, secure grip. Your hands should be dry and free of mud or grease. If you’re getting tired, take a break. A tired grip is a dangerous grip.
Awareness of your surroundings extends beyond just your safe zone. Look up for overhead branches that could snag your swing. Check the ground for uneven footing, roots, or slippery leaves that could cause you to lose balance. In the UK, damp ground and leaf litter are common, so always find a stable, level spot to work. Also, consider the wood itself: is it wet and slippery? Are there hidden knots or nails? A piece of wood that looks innocent can be full of surprises.
Your Mindset is as important as your technique. Never rush. Take your time, focus on the task, and avoid distractions. If you’re feeling tired, frustrated, or distracted, put the axe down and come back to it later. Bushcraft is about enjoying the process, not just the outcome.
Finally, Carrying & Storing your axe properly is essential. Always keep your axe head covered with a sturdy leather sheath when not in use or when transporting it. This protects both the edge and, more importantly, you and your gear. When moving through the woods, carry your axe carefully, ideally with the head covered and held close to your body, or secured safely in your pack. Never just leave it lying on the ground where someone could trip over it or step on it.
To reinforce these safety protocols, we generally recommend looking at general outdoor safety guidelines from reputable UK organisations, such as those provided by the Mountain Training Trust or similar bodies, as they often cover tool use principles applicable to bushcraft. These fundamental rules aren’t just suggestions; they are the bedrock of responsible axe use.
Mastering the Chop: Techniques for UK Woods
Chopping is all about removing wood efficiently, whether you’re limbing a fallen branch, shaping a tent peg, or preparing poles for a shelter. The key to mastering the chop for UK woods lies in understanding how to use your body’s momentum and the axe’s design, rather than relying purely on arm strength.
Let’s start with your Stance. A balanced, stable footing is crucial. Stand with your feet shoulder-width apart, knees slightly bent, and your non-dominant foot slightly forward. This provides a solid base and allows your body to rotate smoothly. Your grip will vary depending on the task: for heavy chopping, use a two-handed power grip, sliding your dominant hand down the handle as you swing to maximise leverage. For more precise work, your dominant hand will be closer to the head for better control.
The Swing is where the magic happens. It should be a smooth, controlled arc, not a wild hack. Initiate the swing with your shoulders and hips, letting your body weight drive the axe head. Your arms guide the axe, but they shouldn’t be doing all the work. As the axe descends, your dominant hand slides down the handle towards the butt, extending your reach and increasing the force of the strike. Aim for the wood with precision. For efficient chopping, you’ll want to create a ‘V’ notch. Make two angled cuts, one above the other, meeting in the middle. The angle you choose depends on the wood’s diameter and type; a shallower angle for thinner wood, a steeper one for thicker pieces. This technique allows you to remove chips cleanly, rather than just burying the axe head into the wood.
When working with Common UK Timber, you’ll quickly notice differences. Birch and pine, for example, are generally softer and chop relatively easily. Their grain is often straight, allowing for clean cuts. Oak and ash, however, are much denser and tougher. They’ll demand more effort and a keener edge. You’ll often find that the grain in oak can be quite interlocked, making it a real challenge. Spending many an hour trying to chop through a particularly stubborn piece of oak teaches that patience and precise, repeated strikes in the same notch are far more effective than just hacking away. Understanding the grain direction is key: try to chop with the grain where possible, or at an angle that allows the wood fibres to separate cleanly.
For beginners, we generally recommend a few Practice Drills. Start by chopping small, fallen branches – about wrist-thickness – into manageable lengths. Focus on your stance, the fluidity of your swing, and aiming for that ‘V’ notch. Don’t try to cut through in one go; multiple, controlled strikes are safer and more effective. Another drill is to try and shave thin curls off a piece of wood with controlled, shallow chops. This builds muscle memory for precision and axe control.
When first trying to build a basic lean-to shelter, many beginners just rely on arm strength, hacking away at some birch poles. After about twenty minutes, their arms are aching, and the poles look like they’ve been gnawed by a badger. It is only after a more experienced bushcrafter shows them how to really use their body, letting the axe do the work with a proper swing and ‘V’ notch technique, that they realise how much energy they’ve been wasting. Suddenly, the task becomes much less tiring and far more efficient. That lesson sticks with most beginners — it is not about how hard you hit, it is about how smart you hit. For more on how these techniques tie into practical applications, have a look at our basic shelter building techniques.
How to Set Up a Safe Chopping Block
Setting up your chopping block properly is a simple yet crucial step for safe and effective axe work. It’s not just about having something to hit; it’s about protecting your axe, your body, and the ground beneath.
- Choose a Stable Base: Find a large, flat-topped log, ideally about knee-height, and at least 18-24 inches in diameter. This provides a solid, immovable surface that won’t wobble or tip when struck. Look for a section of a fallen tree trunk that’s already well-settled.
- Clear the Immediate Area: Ensure your ‘safe zone’ extends around the block itself. Remove any loose stones, roots, or debris that could cause you to trip or deflect your axe. A clear, flat working surface is really important.
- Position for Optimal Stance: Place the block so you can stand comfortably with good footing, allowing for a natural, unhindered swing. You should be able to approach it from multiple angles if needed, without feeling cramped.
- Check for Ground Stability: Make sure the ground around the block is firm and level. If it’s muddy or uneven, your feet could slip, throwing off your balance and potentially leading to an accident. Sometimes a few smaller stones underneath the block can help level it out.
Splitting Logs Safely and Effectively in the UK
Splitting wood is a fundamental bushcraft skill, essential for creating manageable firewood and kindling, especially in the often-damp conditions of the UK. Unlike chopping, which is about removing wood across or at an angle to the grain, the goal of splitting is to drive the axe head with the grain, leveraging the wood’s natural weaknesses to break it apart.
Before you even lift your axe, Choosing Your Target is crucial. Look for logs that are relatively straight-grained, free of major knots, and without too many twists or bends. Knots are where branches once grew, and they create incredibly tough, interlocking grain that makes splitting a nightmare. If you see a crack running along the length of a log, that’s your starting point – the wood is already telling you where it wants to split.
The primary Splitting Technique for most bushcraft purposes is often a controlled drop or a carefully aimed swing, typically performed on a stable chopping block.
- Setting up the log: Place the log upright on a sturdy, flat chopping block. This block should be wide enough to catch your axe if you miss the log, preventing it from hitting the ground (and dulling or damaging the edge). Ensure the area around your block is clear, maintaining your safe zone.
- The ‘controlled drop’: For smaller logs or when you need maximum control, you can place the axe head on top of the log where you want to split it. Then, lift both the log and the axe together, bringing them down sharply onto the chopping block. The momentum of the log carries the axe through. This is incredibly safe and effective for smaller pieces.
- The ‘swinging chop’: For larger logs, you’ll need a proper swing. Hold the axe with both hands, adopting a stable stance. Aim for the centre of the log, or directly into an existing crack. As you swing, let the axe’s weight and your body momentum do the work. The key is a downward, controlled strike that drives the wedge-shaped head into the wood. If the axe gets stuck, don’t wrench it out. Instead, lift the axe and the log together, then bring them down sharply, hitting the log (with the axe still embedded) onto the chopping block. The impact will often drive the axe further, or even split the log entirely.
While a froe is an excellent tool specifically designed for splitting wood by hand, using a baton and a sturdy knife (batoning, which we’ll touch on next) or a wedge and hammer can also be effective alternatives, especially for very large or stubborn pieces.
Common UK Wood Challenges can make splitting a bit trickier. Damp logs, common after a spell of British weather, are heavier and can be tougher to split than dry wood. Springy woods, like some types of ash, can absorb impact rather than splitting, and those stubborn knots in oak or elm can feel impenetrable. Spending an embarrassingly long time trying to split a particularly knotty piece of ash, convinced it will eventually yield, is a common experience. It often does not. The lesson is that sometimes it is smarter to simply leave the really difficult pieces and focus on the easier, straighter-grained timber. No shame in admitting defeat to a stubborn piece of wood!
Once you’ve split your larger logs, you can move on to Kindling Preparation. This involves splitting the larger pieces down into smaller and smaller sticks, often pencil-thin or even finer, which are crucial for getting a fire going quickly. This is where your axe’s precision, or even a good bushcraft knife, comes into its own. For more on getting a blaze going, check out our UK firecraft skills guide.
According to a general understanding of wood properties (as detailed on platforms like Wikipedia’s “Wood” entry), different woods have varying densities and grain structures. For instance, hardwoods like oak or ash have tightly packed fibres, making them resistant to splitting across the grain but excellent for burning slowly. Softer woods like pine or birch, with their straighter grain, split more easily and are great for kindling, though they burn faster. Knowing this helps you choose the right technique and the right wood for the job.
Batoning: A Knife’s Role in Splitting Wood
Sometimes, an axe simply isn’t the right tool for the job, or perhaps you’re in a situation where swinging an axe isn’t practical or safe. That’s where batoning comes into its own. Batoning is a controlled method of splitting wood using a sturdy, full-tang bushcraft knife and a ‘baton’ – a stout piece of wood, usually a branch or a smaller log. You place the knife blade across the end grain of the wood you want to split, then strike the spine (the non-sharp back edge) of the knife with the baton, driving the blade through the wood.
This technique is incredibly useful for splitting smaller pieces of wood, say for kindling or feather sticks, especially when you’re working in confined spaces like a small shelter or a busy campsite where swinging an axe would be a risk. It’s also fantastic for processing smaller diameter logs (up to about 4-6 inches, depending on your knife and the wood) where an axe might be overkill or simply too powerful for the task at hand. It gives you a much finer degree of control than an axe swing.
There are specific Safety Considerations for batoning. Your knife needs to be robust. Only use a full-tang knife (where the blade steel extends the full length of the handle) with a thick spine. Using a flimsy knife or one with a ‘rat-tail’ tang is asking for trouble; the blade can snap or the handle can break, potentially sending the blade flying. Always ensure your baton is solid and free of knots or cracks, and that your hand holding the knife is well clear of the baton’s path. Place the wood you’re splitting on a stable surface, and keep your fingers clear of the cutting edge as you drive the knife through.
How does it differ from axe splitting? Axe splitting uses the weight and leverage of the axe head and handle to generate force, often for larger volumes of wood. Batoning, by contrast, relies on direct, concentrated force applied to the knife’s spine, making it much more precise and controlled for smaller tasks. On a particularly wet trip to Dartmoor where you need tiny, dry slivers of wood to get a fire going, but the wind is howling and swinging an axe safely is a real challenge, batoning with a bushcraft knife allows you to carefully process small, damp branches into perfect kindling without exposing yourself or your gear to unnecessary risk. It can be a proper lifesaver. If you’re keen to learn more about the tools for this, our budget bushcraft knives guide covers everything you need to know.
Axe Maintenance for Longevity and Safety
Looking after your axe isn’t just about making it last longer; it’s a critical safety measure. A dull axe is a dangerous axe, requiring more force to cut, which increases the chance of a slip or a deflection. Proper axe maintenance, including regular sharpening and handle checks, is not just about performance but is a critical safety requirement.
First up, Cleaning after use. Sap, moisture, and dirt can all degrade your axe. After each session, wipe down the head with a damp cloth to remove any sap or residue, then dry it thoroughly. A light coat of oil (like linseed oil or even a bit of cooking oil in a pinch) on the metal head will prevent rust, especially important in our often-damp UK climate.
Sharpening is perhaps the most important maintenance task. A sharp edge bites into wood cleanly, requiring less effort and greatly reducing the risk of glancing off. How often? It depends on how much you use it and what you’re cutting, but you should check your edge regularly. If it doesn’t shave hair easily from your arm, or if you can feel any burrs or flat spots, it’s time to sharpen. For basic field sharpening, a good quality sharpening stone (like a DC4 or a similar combination stone) or a file is ideal. You’ll want to maintain the original bevel angle of the axe head, working one side at a time, pushing the stone or file along the edge in a consistent motion. Finish with a finer grit stone or strop to remove any burr and refine the edge. There are plenty of brilliant guides and videos out there that can show you the specific techniques, but the key is consistency and patience. According to data from the Outdoor Guide UK, properly maintained tools significantly reduce the risk of injury in the field by up to 30%. This highlights just how crucial a sharp edge is for both efficiency and your personal safety.
Handle Care is also vital. Wooden handles can dry out and shrink, leading to a loose head, which is incredibly dangerous. Regularly check that the axe head is firmly seated on the handle. If it feels loose, you might need to re-seat the wedge or even replace the handle. Oiling wooden handles with linseed oil (several thin coats, allowing each to dry) will nourish the wood, prevent it from drying out, and improve grip. Check for any splits or cracks in the handle, especially near the head – if you find any significant damage, it’s time for a new handle.
Finally, Storage. Always store your axe with its sheath on, protecting the edge and preventing accidental injury. Keep it in a dry place, away from extreme temperature fluctuations, which can cause wooden handles to swell or shrink. Never store it leaning against a wall where it could fall, or lying on the ground where it’s a trip hazard.
To give you an idea of the difference, imagine two old axes at home. One meticulously cared for over the years — sharp as a razor, the handle smooth and tight, feeling like an extension of the arm. The other a cheap rescue from a car boot sale that never quite got fully restored. Its head a bit rusty, the edge chipped, and the handle with a slight wobble. Trying to use the second one is a chore; it bounces off wood, gets stuck, and frankly, feels unsafe. The well-maintained one, however, slices through wood with satisfying ease. The difference in usability and safety is night and day, and it really drives home why maintenance isn’t just an optional extra. For more comprehensive advice on all your outdoor tools, have a look at our DIY bushcraft gear projects.
Legal & Ethical Considerations for Axe Use in the UK
Using an axe in our beautiful UK woodlands isn’t just about mastering the physical skills; it’s also about understanding and respecting the legal and ethical boundaries. Responsible axe use in UK woodlands hinges on understanding land ownership and always obtaining permission before using cutting tools, especially on private land. The general principle is simple: always ask for permission.
In the UK, most land is privately owned, even if it looks wild and remote. Using an axe, or any cutting tool, on private land without explicit permission from the landowner or estate manager is considered trespass and can lead to legal issues. This includes felling trees (even dead ones), chopping branches, or even gathering fallen wood for firewood.
When it comes to Public Rights of Way (PRoW), you generally have a right to pass and repass, but this doesn’t extend to activities like chopping, felling, or even collecting wood. These actions are typically prohibited, as they interfere with the landowner’s property and the natural environment. According to the UK Government’s guidance on Countryside Access, the “right to roam” does not grant permission to damage or remove natural resources, reinforcing the need for explicit consent for any cutting activities. This means even a seemingly innocent branch needs permission.
For larger managed areas like National Parks, Forestry England, Forestry and Land Scotland, or Natural Resources Wales sites, specific rules and bylaws will apply. These vary significantly by location, so it’s absolutely crucial to check the local guidance before you visit. Some areas might have designated areas for firewood collection (often for a fee), while others will have a blanket ban on any cutting tools.
The ‘Leave No Trace’ Principles are a vital ethical framework for all bushcraft, and they apply strongly to axe use. This means minimising your impact on the environment. Don’t hack at live trees or damage vegetation unnecessarily. If you are permitted to collect wood, only take what you need, and ensure you’re using Standing Deadwood or fallen timber. Crucially, always avoid live trees. Chopping down a live tree without permission is illegal and environmentally damaging. Even with deadwood, take only small amounts, and try to spread your impact rather than clearing one area. The Leave No Trace Centre for Outdoor Ethics states that planning ahead and preparing is critical for minimising impact, which absolutely includes knowing the rules around tool use.
We always make a point of checking local bylaws or contacting estate managers or Forestry England offices before planning a bushcraft session that involves an axe. There was a time when someone was keen to try out a new technique on some small deadwood in a local woodland. Rather than just assuming it was okay, they sent a quick email to the local council’s parks department. They confirmed that small amounts of fallen deadwood were fine for personal use, but anything requiring cutting tools was strictly prohibited without a specific permit. It only took five minutes to check, and it saved them from potentially getting into trouble or causing damage. It’s always better to err on the side of caution and get clarification. For a broader look at how we can enjoy the outdoors responsibly, take a look at our guide to understanding UK bushcraft land access laws and rights.
Related Reading
Mastering Foundational UK Bushcraft Skills: A Beginner’s Practical Guide Pillar guide that shows how axe work sits alongside fire, shelter, and knife skills for a balanced skillset.
UK Firecraft Skills: From Spark to Sustained Flame Pair your axe work with reliable ignition and fuel prep so processed wood turns into predictable fires in British weather.
Sources & Further Reading
- Mountain Training Trust: Provides comprehensive outdoor safety guidelines, including principles applicable to tool use in various environments.
- UK Government’s Countryside Access Guidance: Offers legal frameworks and responsibilities related to land access and resource use in the British countryside.
- Leave No Trace Centre for Outdoor Ethics: Promotes responsible outdoor practices and environmental stewardship, crucial for ethical bushcraft activities.
Note: This article covers general principles and tips. For advice specific to your situation, get in touch.
Frequently Asked Questions
What’s the best axe for a beginner in the UK?
For most beginners in the UK, we would start with a versatile bushcraft axe or a sturdy hatchet rather than anything oversized. A head weight around 1.5 to 2 lbs with a 16-20 inch handle is usually enough to learn on without becoming awkward or tiring too quickly.
How do I make sure I’m using my axe safely in the woods?
The key point is control. Keep a proper safe zone around you, wear solid boots, and stop as soon as concentration drops. Most preventable axe accidents start with rushing, fatigue, or poor spacing.
Can I split any kind of wood with my axe in the UK?
Yes, but not all wood splits equally well. Pine and birch are usually easier starters, while knotty or damp hardwoods demand more patience and better technique. It is often smarter to choose straighter-grained wood than to force a bad piece to behave.
Where can I legally use my axe in the UK?
Legally, assume private land requires explicit permission and public land requires site-specific checking. In most cases, you should not be felling trees or chopping wood on public rights of way or managed woodland without clear authorisation. A quick check first is far easier than trying to explain yourself afterwards.
What’s the difference between chopping and splitting with an axe?
Chopping removes wood across the grain, usually to shorten, shape, or trim it. Splitting breaks wood along the grain to make firewood or kindling. They use the same tool but different mechanics, and recognising that distinction makes the work cleaner and safer.
Taking the Next Step with Your Axe Skills
The practical goal here is not to look impressive with an axe. It is to create repeatable habits that make wood processing safe, efficient, and legally responsible in UK conditions.
If you’re just starting and want a simple prompt for the wider basics, our Free Bushcraft Starter Checklist is there to help you sort the essentials before you head out.
For a printable reminder of the key safety rules and sharpening steps, download the free Axe Safety & Maintenance Card.