Build a Tinder Bundle That Catches in Rain UK
As an Amazon Associate we earn from qualifying purchases. Some links on this page are affiliate links, which means we may earn a small commission if you make a purchase.
Pinch a clump of your tinder material between your fingers. Does it crumble easily into a fine dust? That’s what you need to catch a spark. Now, try to compress a handful of coarse bark strips into a tight ball. If it holds its shape and feels dense, you’ve got the makings of a shell that sheds rain.
You’ve got a ferro rod, you’ve found what looks like dry grass, and it’s raining. The spark hits and nothing catches. The grass is damp even though it didn’t look it, and the fire is dying before it starts.
This is the moment most beginners give up. But the real issue isn’t the ferro rod, the grass, or even the rain. It’s the structure of what you’re trying to light. A pile of damp tinder isn’t a fire lay; it’s an extinction event waiting to happen.
The fix is a rain-proof tinder bundle. The reason most guides skip it is that it requires preparation before you actually need it. But once you’ve built one and felt it catch a spark in proper British weather, you’ll wonder why nobody explained it sooner.
What Goes Wrong When Everything’s Wet
Rain changes how the whole system behaves. When fuel is damp, the heat from a spark goes into boiling off water rather than igniting the fibres. The spark dies before it can build enough heat to sustain itself. This is why the smallest, finest fuel — your tinder — absorbs moisture first and fails fastest.
📺 Watch: The Ultimate Wet Weather Fire Starter - Featherstick Tinder …
The error most people make is trying to light a pile of material directly. They strike the ferro rod, the spark lands, and the surrounding dampness smothers it instantly. There’s nothing for the heat to build on because the whole structure is fighting the same problem: moisture and insufficient surface area to catch a spark.
Fire lighting is 90% preparation, not luck. That means having tinder that is genuinely dry — or structured in a way that protects its core from damp — and having enough of it, in the right shape, to sustain a flame once one catches.
Charcloth, which many guides recommend as a reliable spark-catcher, requires a fire to make it in the first place. It’s effective once you have it, but it creates a dependency loop that doesn’t help when you’re starting from scratch in wet woodland. You need a fire to make charcloth, but you need charcloth to reliably start a fire in the wet. It’s a genuine catch-22 that the standard advice glosses over.
If you haven’t got your fire lighting kit sorted yet, our guide to fire lighting tools for beginners covers what to carry and why the ferro rod is the right starting point for UK conditions.
Choosing Materials That Work
The material question matters less than most guides suggest — the structure does the heavy lifting. But you still need something to work with, and three options are worth knowing.
Birch bark is the most practical on-site choice for UK woodland. The inner bark of birch trees is naturally resinous and catches a spark readily when it’s dry. The key move is scraping it to remove lichen, which holds moisture like a sponge and will kill your fire before it starts. A clean, dry strip of inner birch bark gives you a moisture-resistant core without needing any prior fire or preparation. According to Tree Guide UK, silver birch is widespread across Britain, and the bark can be collected year-round.
Natural tinders combined with a coal extender is the sustainable, repeatable option. Fibres from plants, dried grasses, or fibrous inner bark can catch sparks, while a coal extender — a material that holds an ember and prolongs the burn — keeps the heat sustained long enough to transfer to your kindling. This combination performs better than any single material because the extender buys time and the fibres catch fast.
Charcloth sits in a different category; it’s a prepared material rather than something you find on-site. It catches sparks even when slightly damp and is genuinely reliable. But as noted above, you need an existing fire to make it. If you’re on a course or have access to a fire from which to produce charcloth, it’s worth carrying. Just don’t start with it as your only option.
The honest summary: birch bark for one-off reliability in the field, natural tinders with a coal extender for repeat use and sustainability, and charcloth as a prepared backup if you’ve already got a fire going. None of these works without the right bundle structure — that’s the missing step.
Building the Two-Layer Structure
Here is the bit that actually matters, and it’s simpler than most guides make it sound.
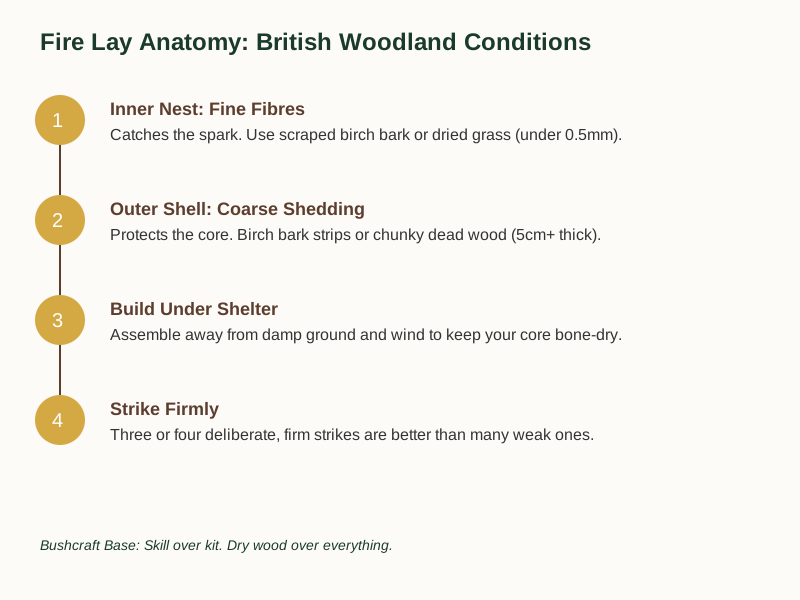
A rain-proof tinder bundle has two layers: a fine inner nest and a coarse outer shell. The inner nest is your spark target; it needs to be extremely fine, almost fibrous. This is what catches the spark and sustains the ember. The outer shell is coarse and chunky — bark strips, dried grasses, fibrous material — and its job is to shed rain droplets away from the core. A thick outer layer helps water run off rather than soaking through.
The structure works because the coarse outer layer keeps moisture away from the vulnerable fine inner material. The fine inner material doesn’t need to be waterproof; it needs to stay dry while you’re building the bundle and while you’re striking the ferro rod. The outer shell handles the rain once you’re in position.
How to build it:
Start with your coarse outer material — birch bark strips, dried grasses, fibrous material from dead standing wood. Form a loose bowl shape roughly 10–12 cm across. You want it dense enough to shed water but loose enough that air can still reach the inner nest.
Now take your finest tinder material — scraped birch bark fibres, dried grass stalks pulled apart, or the inner fibres of dead bracken or fern. Work this into a tight nest in the centre of your coarse bowl, pressing it down so the whole bundle compresses. Make a small depression in the very centre of the fine nest — this is where your spark lands.
The critical step: build the bundle under your jacket, under a tarp, or under any shelter you can manage. The inner nest must stay dry while you assemble it. The outer shell handles rain once you’re outside, but the core is vulnerable until you’re ready to strike.
What you’re aiming for is a structure that holds its shape when you pick it up. If it falls apart in your hands, it’s too loose. If you can’t compress it at all, the coarse outer layer is too thick.
This is the step that transforms a pile of damp tinder into something that works in rain. The material matters, but the structure is what makes any material work when the weather is against you.
Lighting Your Bundle
Once your bundle is built and your ferro rod is in hand, the lighting process is straightforward — the structure you’ve built handles most of the hard work.
With a ferro rod (Light My Fire FireSteel Army, Rusty Orange (paid link), Exotac NanoStriker XL Orange (paid link), or similar): Hold the rod in one hand and the striker in the other, or use a scraping motion — whichever technique suits your specific tool. Strike firmly downward so the shower of sparks falls directly into the depression in your inner nest. The coarse outer shell will shelter the spark from wind and rain. You need three or four good strikes, not a gentle scrape. The FireSteel produces a hot, consistent spark that works well with the right tinder. The Exotac NanoStriker XL Orange is compact and reliable, though the disassembly process can be fiddly, so it’s worth practising at home.
See Light My Fire FireSteel Army, Rusty Orange on Amazon → (paid link)
With stormproof matches (Lifesystems Stormproof Waterproof and Windproof Matches (paid link) or similar): Light one and hold it under the inner nest rather than trying to strike directly into it. Lifesystems states its stormproof matches burn for up to 20 seconds, which is enough to get the fine fibres smouldering. These are a solid backup — they are built for wind and rain — but the quantity is limited, so don’t use them as your primary method.
See Lifesystems Stormproof Waterproof and Windproof Matches on Amazon → (paid link)
Rekindling: If you’ve got a small ember going but it’s struggling, a Spitfire Pocket Bellows (paid link) gives you better control than blowing by mouth and keeps your face away from the sparks. It’s a rekindling tool rather than a primary fire starter, and owners appreciate the UK-made quality and the fact that the rubber mouthpiece stays waterproof.
See Spitfire Pocket Bellows on Amazon → (paid link)
The spark lands in the depression, the fine inner fibres catch and glow, and the coarse outer shell keeps the wind and rain off while the ember grows. Once you have a small flame, feed it carefully — small, dry kindling first, building up. The bundle has done its job; everything else is technique and patience.
Now you’ve got the method — Download the Free Bushcraft Starter Checklist to make sure your kit has everything you need before you head out.
Common Questions
Can I use cotton wool balls as tinder?
Yes, but plain cotton wool absorbs water almost instantly in damp conditions and will fail in the rain. If you want to use cotton wool, work it into a tight ball and coat it thoroughly with petroleum jelly — the jelly repels water and burns hot enough to catch a spark. Store it in a waterproof container. Without the petroleum jelly coating, cotton wool is a liability in wet weather, not an asset.
What if I can’t find birch bark?
Dry grasses, the inner bark of other trees, shredded plant fibres, or even shredded newspaper (carried in a waterproof bag) can work as your fine inner material. For the coarse outer shell, dried dead wood, bark from other species, or fibrous plant material all do the job. The structure is the critical part; the specific material is flexible as long as you have something fine to catch the spark and something coarse to shed rain.
How do I keep the inner nest dry while I’m building the bundle?
Build it under shelter — your jacket, a tarp, an overhang, anything that keeps rain off while you work. The inner nest is vulnerable until the outer shell is complete. Once the bundle is built and the outer shell is dense enough, you can step out into the rain and strike the ferro rod. A thick outer layer will shed water effectively.
| Layer | Material | Purpose | Thickness |
Your Pre-Trip Build Sheet
The rain-proof bundle is the one piece of kit that makes carrying extra fire starters largely redundant. It’s a self-contained ignition system that works in conditions where other methods falter.
Before you head out, treat this guide as your build sheet. Build the outer shell, pack the inner nest, compress it to a dense ball, and practise the strike. Once you’ve done it a couple of times, it becomes instinctive.
Build the bundle, light it, see how it behaves. When you’re confident with the structure, you’ll know exactly what to do when the rain comes in and everyone else is struggling.
Download the Free Bushcraft Starter Checklist for a straightforward guide to the kit and preparation that actually matter for getting a fire going in British woodland.
Related Guides
For more on the tools that complement this method, see our UK Firecraft: Mastering Fire Lighting Tools for Damp Conditions .
References
- Forestry England
- Tree Guide UK: Silver Birch
- Lifesystems Stormproof Waterproof and Windproof Matches
As an Amazon Associate we earn from qualifying purchases. The products linked above are ones we think are worth a look.
Note: General guidance only, verify details with a qualified professional or official source.