How to Find Safe Water When Bushcrafting UK (And What to Avoid)

As an Amazon Associate we earn from qualifying purchases. This page contains affiliate links — if you buy through them, we earn a small commission at no extra cost to you.
Water in the UK is easy to find and easy to misjudge. A clear stream can still carry bacteria, protozoa, or contamination from farms and settlements upstream, which is why collection and purification matter just as much as having enough to drink. This guide sits alongside our foundational bushcraft skills pillar, giving you the hydration piece of the core-skills puzzle.
Why Worrying About Water is Smart (The Real Risks)
Understanding the genuine risks associated with untreated water in the UK wilderness is the first crucial step to taking water safety seriously, and honestly, it’s not just about avoiding a bit of a tummy ache. The immediate effects of dehydration are bad enough – headaches, fatigue that saps your energy, and a real drop in your ability to make good decisions. That last one can be genuinely dangerous if you’re navigating tricky terrain or need to react quickly to changing weather.
But beyond just feeling rough, the less immediate, more insidious risks come from invisible nasties lurking in seemingly pristine water. We’re talking about things like Giardia and Cryptosporidium, which can lead to debilitating stomach cramps, diarrhoea, and vomiting that can last for weeks, sometimes even months. Then there are bacteria like E. coli, which can cause severe food poisoning-like symptoms. While viruses are less common in UK freshwater compared to bacteria and protozoa, they can still be present. And let’s not forget potential chemical contamination, though usually less of a concern for remote sources, it’s always a possibility near agricultural or industrial areas.
Think of these microscopic invaders – protozoa like Giardia and Cryptosporidium, or bacteria like E. coli – as tiny, unwelcome guests. Once ingested, they set up shop in your gut, disrupting your digestive system and making you feel absolutely dreadful. They essentially hijack your body’s processes, leading to those nasty symptoms. It’s why we take purification so seriously; we’re essentially evicting them before they even get a chance to cause trouble. According to the UK Health Security Agency, waterborne diseases remain a public health concern, with outbreaks often linked to contaminated private water supplies. This really underscores the need for vigilance when sourcing water in the wild. If you’re interested in broader outdoor safety, check the practical checklist in our essential health & safety guide.
Many beginners once see a group who’d just drunk straight from a seemingly clear stream near a farm. They spent their entire weekend with stomach cramps and worse, completely ruining their trip and needing to cut it short. It’s not worth the risk, honestly. These aren’t just minor inconveniences; they can completely derail your trip, potentially require a rescue, and lead to serious medical intervention. According to the NHS, water purification tablets are a key tool in preventing such illnesses, highlighting the genuine threat of waterborne pathogens.
Why is UK water deceptively risky? Well, our beautiful green landscape is also heavily farmed and populated. This means that even in seemingly remote areas, you can have agricultural runoff carrying pesticides or animal waste (from sheep, cows, or even wild animals) into streams and rivers. Human activity upstream, even just a few miles away, can introduce bacteria. That crystal-clear mountain stream might have a sheep carcass rotting just out of sight, or a leaky septic tank further up the valley. It’s why having a solid foundation of other bushcraft skills, beyond just water, is so important – it helps you assess the whole environment. Your desire for enjoyable, memorable trips, free from misery, hinges on taking water purification seriously.
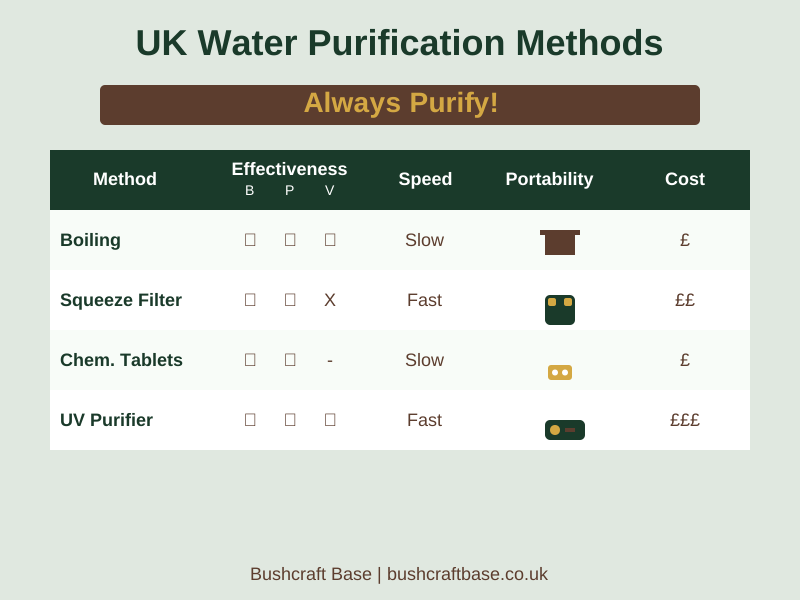
Comparing UK Water Purification Methods
| Method | Effectiveness (B/P/V) | Speed | Portability | Cost (£) |
|---|---|---|---|---|
| Boiling | High / High / High | Slow (cool) | Low | Low |
| Squeeze Filter | High / High / Low | Fast | High | Medium |
| Chem. Tablets | High / High / Medium | Slow (wait) | Very High | Low |
| UV Purifier | High / High / High | Fast | Medium | High |
Finding Your Water Source in the UK: What to Look For (and Avoid!)
Successfully finding a safe water source in the UK is about more than just stumbling upon a puddle; it requires a keen eye, an understanding of the landscape, and a healthy dose of caution. Generally speaking, prioritising flowing water sources upstream from potential contamination points like farmland and settlements is your best bet, as stagnant or discoloured water should always be treated as a higher risk.
When we talk about ‘prioritising flowing water’, there is a good reason for it. Moving water, especially fast-flowing streams and burns, has a natural self-purification process, though it’s never enough to rely on completely. The constant movement helps to aerate the water and can physically dilute contaminants, carrying them downstream. Stagnant water, on the other hand, acts like a breeding ground, allowing pathogens to multiply undisturbed, which is why we give it a wide berth.
Let me explain the types of sources you’ll encounter in the UK:
- Moving Water: This is your absolute priority. Streams, rivers, and especially the fast-flowing “burns” in Scotland or smaller rivers in the Peak District, are generally better. Why? The movement of water helps to aerate it and can prevent the build-up of some pathogens, though it’s by no means a guarantee of safety. Look for a good, strong flow and clarity. A fast-moving burn coming off a high moor, for example, is usually a fantastic sign. It’s usually travelled a good distance, picking up fewer contaminants than a slow river meandering through farmland. In hilly country, listening for running water before you can see it often saves a lot of pointless wandering.
- Still Water: Lakes, tarns (small mountain lakes in places like the Lake District), and ponds are much higher risk. The lack of flow allows pathogens and contaminants to settle and multiply. If you absolutely must use still water, try to collect it from the surface, away from the banks, and where there’s some evidence of movement (like wind ripples). This is truly a last resort.
- Rainwater Collection: Honestly, this is the gold standard if you can manage it. Rainwater collected directly into a clean container (like a tarp funnelled into a bottle or billy can) before it hits the ground is often the cleanest natural source available. It’s free from ground-based contaminants and is perfect for boiling or filtering. The Met Office provides excellent weather forecasts, so you can often plan for a rainy spell to top up your reserves.
- Dew Collection: More effort, and definitely less volume, but possible. You can use an absorbent cloth, like a bandana, to wipe dew off grass and then wring it into a container. It’s slow going, but in a pinch, it can provide enough for a brew.
- Snow/Ice Melt: A seasonal consideration, particularly in the Scottish Highlands or Welsh hills in winter. Melting snow or ice directly into a pot is a good source, but remember that snow can absorb airborne pollutants, and it doesn’t always melt into perfectly clean water. Always purify it, just to be sure.
Now, how do you sort the safe-looking from the actually-safe?
- Visual Cues: Clarity is a good start – clear water is easier to purify. But don’t be fooled; clear doesn’t mean clean! Discoloured water, especially greenish (algae) or brownish (mud, peat), usually indicates higher levels of sediment and potential contaminants. A strong smell, especially foul or chemical, is an absolute red flag.
- Location, Location, Location: This is probably the most critical factor. Always look upstream for potential contamination sources. Are there farms with livestock (sheep, cows) nearby? Agricultural runoff from fields is a huge source of pathogens. Are there any human settlements, even small villages, or industrial areas? Any pipes or drains entering the water? These are all massive warning signs. Avoid stagnant water completely. When you’re planning your trip to these amazing spots, always factor in potential water sources and their surroundings. For more about our approach, you can check out our about page.
- Understanding the Terrain: Our beautiful UK landscapes have unique features. Peat bogs, common in the Highlands and some parts of Wales, can make water a dark tea colour. This ‘peat staining’ often doesn’t mean the water is unsafe biologically, but it can be harder for some filters to process and might taste a bit earthy. However, the water coming off high peat bogs is often some of the cleanest you’ll find, as long as there’s no upstream contamination. Keep an eye out for sheep tracks leading to water – while the water might be fresh, the banks will be covered in animal waste, making collection tricky and risky. The Environment Agency provides excellent information on water quality, which can help you understand regional risks like agricultural impact.
The truth is, even if it looks like bottled spring water, always assume it needs purifying. It’s better to be safe than sorry when it comes to your health in the wild.
Making Water Safe: Your Beginner’s Purification Toolkit
Once you’ve found a potential water source in the UK wilderness, the golden rule kicks in: Always Purify! We cannot stress this enough. Even the clearest, coldest stream water can harbour invisible threats that will put a serious dampener on your trip, or worse. Now, let’s talk about the essential tools and methods you’ll want in your beginner’s purification toolkit.
Understanding how these methods work isn’t just academic; it helps you trust your gear and make informed decisions in the field. Essentially, we’re either killing the bugs with heat or chemicals, or physically removing them with a filter. Each method has its strengths and weaknesses, so knowing a bit about the science behind them can be a real confidence booster.
Method 1: Boiling (The Gold Standard)
Boiling is, hands down, the most reliable method for killing all biological threats – bacteria, viruses, and protozoa. It’s been used for centuries, and it still works brilliantly.
- How it works: The high temperature denatures the proteins in microorganisms, effectively killing them. Think of it like cooking an egg – the heat changes the egg white from clear to solid, permanently altering its structure. Boiling does a similar thing to the proteins inside bacteria, viruses, and protozoa, rendering them unable to function or reproduce. It’s a brute-force but incredibly effective method.
- Practical steps:
- Collect your water in a metal container, like a billy can or a sturdy metal pot.
- Place it over a fire or on a portable stove. A good knife is essential for preparing wood for boiling if you’re going the fire route.
- Bring the water to a rolling boil. This means it’s bubbling vigorously, not just simmering.
- Maintain this rolling boil for at least one minute. If you’re at higher altitudes (above 2,000 metres, which is rare but possible in the Scottish Highlands), you might need to boil for around three minutes, as water boils at a lower temperature up high.
- Let the water cool completely before drinking. Pouring it into another clean container can speed this up.
- Pros: Highly effective against all biological threats. No special gear beyond a pot and heat source.
- Cons: Requires fuel (firewood or stove gas), time, and a suitable container. Doesn’t remove sediment, chemicals, or improve taste. You’ll have to wait for it to cool down, which can be a faff when you’re parched.
Method 2: Water Filters (Your Best Friend)
Modern water filters are worth their weight in gold for convenience and speed, making them a fantastic option for any UK bushcrafter or wild camper.
- How they work: Filters use a physical barrier with extremely tiny pores to physically block out microorganisms. Most modern filters, especially those hollow fibre types, are essentially a bundle of tiny, spaghetti-like tubes with microscopic holes in their walls. When you push water through, the water molecules can pass, but the much larger bacteria and protozoa simply can’t fit through the pores and get trapped. Ceramic filters work similarly but use a solid, porous block of ceramic material.
- Types relevant to beginners:
- Squeeze Filters: These are incredibly popular. You screw the filter onto a dirty water bag (often included), fill the bag with water, and then squeeze it through the filter into a clean bottle or directly into your mouth. The Sawyer Mini (paid link) is a prime example.
- Pump Filters: More solid, often used for larger volumes or very murky water. You pump water through a hose from the source, through the filter, and into your clean container. MSR MiniWorks EX is a well-regarded pump filter.
- Straw Filters: Designed for immediate, direct drinking from a water source. Great for emergencies or quick sips, but less practical for filling bottles for later.
- What to look for:
- Micron rating: This is crucial. For bacteria and protozoa (like Giardia and Cryptosporidium), you want a filter with a pore size of 0.2 microns (µm) or smaller. Most reputable outdoor filters meet this.
- Flow rate: How quickly water passes through. This can vary and will decrease as the filter clogs.
- Durability & Ease of Use: You want something tough enough for the outdoors and simple to operate, especially when your hands are cold or you’re tired.
- Filter material: Hollow fibre filters (common in squeeze filters) are lightweight and efficient. Ceramic filters (often in pump filters) are more durable and can be cleaned in the field but are heavier.
- UK considerations: Our water can be quite silty or peaty, especially after heavy rain. Filters can clog quickly with cloudy water. Pre-filtering (using a bandana, coffee filter, or even a sock) to remove larger sediment before it hits your main filter will significantly extend its life and maintain flow rate.
- Pros: Quick and convenient. Highly effective against bacteria and protozoa. Relatively easy to use. No waiting time for cooling.
- Cons: Don’t typically remove viruses (though these are less common threats in UK freshwater). Can clog, reducing flow rate and lifespan. Requires maintenance (backflushing). Can be an upfront investment. Boiling is foolproof but a faff when you are knackered. Investing in a decent squeeze filter makes a noticeable difference because you can get safe water far more quickly. If you’re using a squeeze filter with a dirty water bag, hanging the bag above your clean bottle can let gravity do much of the work for you.
Method 3: Chemical Treatments (Tablets/Drops)
Chemical treatments are lightweight, compact, and excellent as a backup or when boiling/filtering isn’t feasible.
- How they work: These chemicals release active agents that kill or inactivate microorganisms. Chlorine dioxide, my preferred choice, works by releasing oxygen which then oxidises (essentially ‘burns’) the cell walls of bacteria, viruses, and protozoa. It’s a bit like a controlled, microscopic explosion that destroys the pathogens. Iodine works in a similar way, interfering with the microorganisms’ cellular processes, but it tends to leave a stronger taste.
- Types:
- Chlorine Dioxide: My preferred choice. It’s effective against bacteria, viruses, and protozoa, and has less of a noticeable taste than iodine. Brands like Aquamira or Katadyn Micropur Forte are good.
- Iodine: Also effective, but leaves a very distinct, often unpleasant, taste. Not recommended for pregnant women or people with thyroid conditions.
- Practical steps:
- Collect your water. If it’s cloudy, let it sit for a while to allow sediment to settle, or pre-filter it.
- Add the correct number of tablets or drops for the volume of water you have. Read the instructions carefully – dosage is crucial.
- Wait the specified time. This is absolutely critical and often longer than people expect (e.g., 30 minutes for bacteria, up to 4 hours for Cryptosporidium with some products). Don’t rush it!
- Swirl the water occasionally to ensure even distribution.
- Drink.
- Pros: Extremely lightweight and compact, making them perfect for emergency kits or as a backup. Effective against a broad range of biological threats.
- Cons: Can leave a taste (especially iodine). Effectiveness can be reduced by very cold or cloudy water. Long waiting times. Don’t remove sediment. Have expiry dates. The World Health Organisation (WHO) recommends chemical disinfection, particularly with chlorine-based compounds, as an effective method for point-of-use water treatment, especially when boiling isn’t practical.
Method 4: UV Purifiers (Mention Briefly)
UV purifiers use ultraviolet light to scramble the DNA of microorganisms, preventing them from reproducing and making them harmless.
- How it works: Imagine the UV light as a tiny, invisible stun gun for bacteria and viruses. It doesn’t physically remove them, nor does it kill them in the traditional sense. Instead, it damages their DNA, making them unable to reproduce. If they can’t reproduce, they can’t make you ill. Clever, right? The catch is, the water has to be clear for the UV light to reach all the nasties.
- Pros: Kills bacteria, viruses, and protozoa. No chemicals, no taste.
- Cons: Requires batteries (and backups!). Doesn’t work in cloudy water (you need clear water for the UV light to penetrate effectively). Can be expensive. Less common for beginners due to cost and battery reliance.
For beginners, I’d honestly recommend starting with a good squeeze filter like the Sawyer Mini (paid link) or a LifeStraw (paid link) and carrying some chlorine dioxide tablets as a backup. That combination gives you speed, effectiveness, and a solid plan B. If you have got any specific questions about gear recommendations, do not hesitate to get in touch – we are always happy to chat about what our team have found works best. You can also see how these items slot into your pack in our essential UK bushcraft kit list.
Step-by-Step: Practical Purification in the Field
Right, let’s get down to the nitty-gritty of actually purifying your water out in the field. Effective field purification involves methodical steps: pre-filtering murky water, ensuring adequate contact time for chemicals, or a sustained rolling boil for at least one minute. No matter which method you choose, cleanliness is key – always start with clean hands and clean containers! For quick fuel prep to get that boil going, pair these steps with the techniques in our UK firecraft skills guide.
Scenario 1: Using a Squeeze Filter (like a Sawyer Squeeze)
This is a brilliant, quick method for most UK conditions.
- Find your source: Refer back to our section on what to look for. Aim for flowing, clear water if possible.
- Pre-filter if necessary: If the water is at all murky, cloudy, or has visible bits floating in it (peat sediment, leaves, etc.), use a bandana, buff, coffee filter, or even a clean sock to strain the water into your dirty water collection bag first. This stops your filter from clogging up too quickly. The biggest mistake we see with filters is people trying to suck mud through them. A quick rinse of the collection bag, and maybe a quick squeeze through a buff first, makes a world of difference to the filter’s life and flow rate.
- Attach filter: Screw your squeeze filter onto the dirty water bag securely. Make sure it’s a tight fit to prevent any untreated water from sneaking past.
- Squeeze water through: Invert the bag and squeeze the water through the filter directly into your clean drinking bottle or cooking pot. Keep the outlet of the filter away from dirty surfaces – we don’t want to cross-contaminate now, do we?
- Store filter correctly: After use, backflush your filter (follow manufacturer instructions, usually involves squeezing clean water backwards through it) to clear out debris. Store it in a clean, dry place to prevent mould or freezing damage.
Scenario 2: Boiling Water
The most reliable method, especially if you’re not entirely sure about your water source.
- Collect water: Gather your water in your metal billy can or pot. Again, if it’s got a lot of sediment, let it sit for a bit to allow the particles to settle, or pre-filter it through a cloth – it just makes the final product more appealing.
- Set up your stove or fire: Get your heat source ready, whether it’s a trusty gas stove or a carefully constructed bushcraft fire. If using a fire, make sure it’s safe, contained, and you’re adhering to all local regulations.
- Heat the water: Place your pot on the heat source, ensuring it’s stable and won’t tip over. Keep an eye on it, especially if using a roaring fire.
- Bring to a rolling boil: Wait until the water is vigorously bubbling, not just simmering with a few lazy bubbles. We need that proper, enthusiastic boil to do its job.
- Maintain the boil: Keep it at a rolling boil for at least one full minute. If you’re high up in the mountains, say above 2,000 metres, make it three minutes to be absolutely certain.
- Let cool: Take it off the heat and let it cool down before drinking. You can gently transfer it to a clean water bottle to speed this up, but be careful not to contaminate it during the transfer.
Scenario 3: Using Purification Tablets
Your reliable backup, or for when you need to keep things lightweight.
- Collect water: Fill your bottle or container with water from your chosen source. Pre-filter if the water is cloudy, as sediment can reduce the tablets’ effectiveness and might leave you with some floaty bits.
- Add tablets: Read the instructions on the packet carefully! Add the correct number of tablets for the volume of water you’ve collected. Too few, and it won’t work; too many is just a waste.
- Wait the specified time: This is crucial. For most tablets, it’s typically 30 minutes for bacteria and viruses, but often 4 hours for Cryptosporidium. Don’t guess – check the instructions! Patience is key here.
- Swirl (optional): Give the bottle a gentle shake occasionally to ensure the chemical is evenly distributed throughout the water. This just helps everything work as efficiently as possible.
- Drink: Once the waiting time is up, your water is ready to drink. Give it a sniff – some tablets can leave a slight taste, but it’s a small price to pay for safe hydration.
These steps, while simple, are vital for your safety. Always designate one bottle as your dirty-water container and another as your clean-water container, especially if you’re using a filter or chemical treatment. That simple separation cuts the risk of cross-contamination dramatically.
Related Reading
Mastering Foundational UK Bushcraft Skills: A Beginner’s Practical Guide Where water, fire, shelter, and knife skills come together for a balanced skillset.
UK Firecraft Skills: From Spark to Sustained Flame for Beginners Get reliable boils and hot drinks by pairing this water guide with repeatable ignition and fuel prep in British weather.
Common Mistakes Beginners Make (And How to Avoid Them)
Look, we have all been there. Bushcraft is a learning curve, and most beginners have made their fair share of daft mistakes in the woods. But when it comes to water, some errors can have serious consequences. Proactively addressing common pitfalls will build your confidence and prevent errors, ensuring your trips are memorable for the right reasons.
Here are some of the most common mistakes beginners make with water in the UK, and how to steer clear of them:
- Mistake 1: Assuming clear water is safe. This is probably the biggest and most dangerous assumption. That beautiful, sparkling stream looks inviting, doesn’t it? But as we’ve discussed, clarity has absolutely no bearing on biological safety. Invisible bacteria, protozoa, and viruses can thrive in crystal-clear water. Solution: ALWAYS purify, no matter how clean it looks.
- Mistake 2: Not purifying enough water before setting off. You might find a great source, purify a bottle, and think you’re sorted. But what if the next source is dry, or contaminated? Or what if you just need more than you anticipated? Solution: Plan your water needs. Purify enough to last you until your next confirmed safe source, plus a bit extra for emergencies.
- Mistake 3: Contaminating the ‘clean’ side. This is incredibly easy to do. You’ve got your filter, you’ve got your clean bottle, but then you touch the filter’s outlet with dirty hands, or let it touch the ground. Or you use a dirty cup to drink your purified water. Solution: Practice strict hygiene. Wash your hands, keep all your ‘clean’ gear separate, and be mindful of where your purified water and the clean side of your filter/bottle touch.
- Mistake 4: Relying on a single purification method. What if your filter clogs beyond repair? What if you run out of fuel for boiling? What if your tablets expire or get wet? Solution: Always carry a backup. If you use a filter, carry some purification tablets. If you rely on boiling, carry a filter or tablets. Many beginners once forget to pack purification tablets on a trip. Thankfully, they still have their filter, but it is a stark reminder — always have a backup, even if it is just a small emergency pack of tablets.
- Mistake 5: Not checking filter lifespan or expiry dates on tablets. Filters have a limited capacity (e.g., 100,000 litres for a Sawyer). Tablets have expiry dates, and their effectiveness diminishes over time. Solution: Know your gear. Check your filter’s specs and replace it when needed. Always check the expiry date on your tablets before a trip. If you are looking for the best filter options, it is worth doing your research, and we often share the latest gear reviews on our blog. The Mountaineering Council of Scotland (MCofS) and the British Mountaineering Council (BMC) both provide essential safety advice for hillwalkers, consistently emphasising solid water purification strategies to prevent illness in remote areas.
- Mistake 6: Ignoring potential upstream contamination sources. You’ve found a lovely stream, but you haven’t looked further up the valley. Is there a farm a mile upstream? A popular wild camping spot? A public footpath? Solution: Always look upstream. Walk a bit further if you need to, or choose a source that’s clearly high up and away from human or intensive agricultural activity.
Before any significant trip, especially a multi-day one, take five minutes to physically check your water purification kit. Run a little clean water through your filter to ensure it’s not clogged, verify your tablets aren’t expired, and check your stove fuel. A quick pre-trip check can save a lot of hassle and worry when you’re out in the wild.
Avoiding these common pitfalls will make your water procurement and purification much safer and more efficient, letting you enjoy your time outdoors without unnecessary worry.
Sources & Further Reading
- UK Health Security Agency: Provides public health guidance on waterborne diseases and outbreaks.
- NHS: Offers health advice, including prevention of illnesses through water purification.
- Environment Agency: Supplies information on UK water quality and environmental risks.
- World Health Organisation (WHO): Recommends methods for point-of-use water treatment globally.
Note: This article covers general principles and tips, so always adapt advice to your own experience and conditions. For advice specific to your situation, get in touch.
Your UK Water Safety Checklist (Quick Reference)
Having a quick, digestible summary of water safety is incredibly useful when you’re out in the field. A solid UK water safety strategy involves prioritising clean sources, using reliable purification methods consistently, and maintaining strict hygiene throughout the process. Keep a laminated version of this checklist in your rucksack. Quick glance, sorted.
Procurement:
- Prioritise fast-flowing, moving water (streams, burns).
- Always check upstream for potential contamination (farms, settlements, livestock).
- Avoid stagnant, discoloured, or foul-smelling water.
- Collect rainwater directly when possible – it’s often your cleanest option.
Purification:
- ALWAYS PURIFY all wild water, no matter how clean it looks.
- Boiling: Bring to a rolling boil for at least 1 minute (3 mins at high altitude).
- Filters: Use a reputable filter (0.2µm pore size for bacteria/protozoa). Pre-filter murky water.
- Chemicals: Follow instructions precisely for dosage and crucial contact time.
- Backup: Always carry at least two different purification methods.
Hygiene:
- Ensure your hands are clean before handling purified water or gear.
- Keep all ‘clean’ containers and filter outlets separate from ‘dirty’ water and surfaces.
- Regularly clean and maintain your purification equipment.
Keep this handy for your next trip – download my full, printable checklist to take with you.
Frequently Asked Questions
Can I just drink water from a UK stream if it looks clean?
No. Clear water can still carry bacteria, protozoa, viruses, or contamination from livestock and human activity upstream. I would treat every wild source as unsafe until I’ve purified it properly.
What’s the best water filter for wild camping in the UK?
For most beginners, a squeeze filter is the easiest place to start because it is simple, packable, and quick to use. Look for a pore size of 0.2 microns (µm) or smaller so it can deal with bacteria and protozoa, and carry tablets as a backup in case the filter clogs or fails. A straw filter can work, but it is less useful when you want to fill bottles for later.
How long do I need to boil water for?
Bring it to a proper rolling boil and keep it there for at least one full minute. If you’re high up in the hills, boiling for longer gives you a safer margin because water boils at a lower temperature with altitude. It is slow, but it remains the most dependable biological treatment.
Are water purification tablets reliable in the UK?
Yes, if you use them exactly as directed. The two mistakes people make are guessing the dose and not waiting long enough, especially when the product needs a longer contact time for certain pathogens. I treat tablets as an excellent backup, not something to use casually without reading the packet.
Where’s the safest place to collect water in the UK?
Fast-flowing water high up in the hills is usually the best starting point, especially if it is well away from farmland, roads, camps, and livestock. Rainwater caught directly into a clean container is also one of the safest options you can get outdoors. Even then, I still think in terms of lower risk rather than guaranteed safe and purify accordingly.
Taking the Next Step
The core habit is simple: choose the best source you can find, purify it every time, and keep your clean side genuinely clean. Once that becomes routine, water stops being a worry and starts becoming just another part of good campcraft.
Ready to put this into practice and ensure you’re fully prepared for your next adventure? Grab my free Bushcraft Starter Checklist. It’s packed with all the essentials you’ll need, including a handy reminder for water safety, to make sure your first few trips are brilliant, not baffling.
For a printable comparison of purification methods and where to find water, grab the free UK Water Purification Reference.